Business Articles - On the Job
Articles & Tips
If you know your soil bearing capacity, following these practical guidelines will ensure strong footings
by Brent Anderson P.E.

Under every house is a foundation, and under most foundations are footings. Most of the time we take footings for granted, and usually we can: For typical soils, a common 16- or 20-inch-wide footing can more than handle the relatively light weight of an ordinary house.
On the other hand, if you build on soft clay soil or if there's a soft zone under part of your foundation, there can be trouble. A footing that performs well in good soil may not do so well in weak bearing conditions. We don't often see outright failure, but it's not uncommon to see excessive settlement when soil bearing capacity is low.
If the whole house settles slowly and evenly, some additional settlement is no big deal; but if settlement is uneven (differential settlement), there could be damage. A frame house with wood siding and drywall interiors can probably handle up to 1/2 inch of differential foundation movement, but even 1/4 inch of uneven settling is enough to cause cracks in masonry, tile, or plaster.
It's the unusual situations that cause the most trouble. When the footing is laid out off-center so the wall misses its bearing, when you encounter a soft zone on site, or when the footing is undersized, the builder faces a judgment call. If you think there's a problem ahead, you know you should stop and call an engineer. But if the risk is low, you'd like to keep the job moving.
In these tough cases, it's helpful to understand the bearing strength of soil and the reasons behind footing design rules. In very strong soils, minor mistakes probably aren't a big deal. In weak or marginal soils, however, it's best to be very cautious -- some of the solutions contractors think up may not really work.
I'm a consulting engineer as well as a contractor, and I get called in to a lot of problem situations. I find that people understand the problems better if they have some background knowledge. For the benefit of builders in the field and at the risk of oversimplifying, I'm going to use non-technical language in this article to briefly explain a little about how footings work and to present some ideas for dealing with special situations. As you look at the solutions I recommend, however, keep in mind that high-bearing-capacity soil is assumed. Any time you're in doubt about the soil under your foundation, you'd be wise to get professional help.
Why Soils Matter
In addition to providing a level platform for forms or masonry, footings
spread out the weight of the house so the soil can carry the load. The load
spreads out within the footing itself at about a 45-degree angle, and then
spreads out in the soil at a steeper angle, more like 60 degrees from the
horizontal (see Figure 1).
 |
| Figure 1. As the load under a footing spreads out, pressure on the soil diminishes. Soil directly under the footing takes the greatest load, and therefore should be thoroughly compacted. |
Because the load spreads out, the pressure on the soil is greatest right beneath the footing. By the time we get down below the footing a distance equal to the footing's width, the unit soil pressure has dropped by about half. Go down the same distance again, and the pressure has dropped by two-thirds. So it's the soil right under the footing that is the most critical -- and also, typically, the most abused.
When we excavate for the footings, the teeth on the bucket stir up the soil and mix air into it, decreasing its density. Also, soil from the embankment may fall into the trench. That loose soil has much less bearing capacity than the original soil. That's why it is so important to compact the trench bottom (use a vibrating plate compactor for sand or gravel soils, and a jumping jack compactor for silt or clay). If you don't compact that soil, you could get 1/2 inch of settlement in just the first 6 inches of soil.
If you dig too deep and replace the soil to recover the grade, you are adding back soil that has expanded by as much as 50%. Under load, it will reconsolidate and cause settling. So when you replace material in the trench, compact it thoroughly, or else use large gravel. One-inch-and-a-half or larger gravel is virtually self-compacting as you place it. Under the weight of a wood house, it won't settle to any significant degree.
Soil types and bearing. The type and density of the native soil is also important. The International Building Code, like the CABO code before it, lists presumed bearing strengths for different types of soils (see "Soil Bearing Capacities," below). Very fine soils (clays and silts) typically have lower capacities than coarse granular soils (sands and gravels).
Soil Bearing Capacities |
|
Class
of Materials |
Load-Bearing
Pressure (pounds per square foot) |
Crystalline bedrock |
12,000
|
Sedimentary rock |
6,000
|
Sandy gravel or gravel |
5,000
|
Sand, silty sand, clayey sand, silty
gravel, and clayey gravel |
3,000
|
Clay, sandy clay, silty clay, and clayey silt |
2,000
|
Source: Table 401.4.1; CABO One- and
Two- Family Dwelling Code; 1995. |
|
However, some clays or silts have higher bearing capacity than the values in the code tables. If you have a soil test done, you could discover that you have a denser clay with a much higher bearing strength. Mechanically compacting the soil can also raise its bearing capacity.
You can get a pretty good idea of the soil bearing capacity in the trench bottom using a hand penetrometer (Figure 2). This pocket-sized device is a spring-loaded probe that estimates you the pressure the soil can resist and is calibrated to give readings in tons per square foot. In my opinion, every contractor and building inspector should have one of these -- it can help you avoid a lot of trouble.
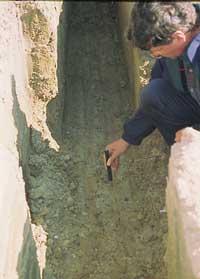 |
Figure 2. The author checks soil density in a footing trench using a penetrometer. Soil strength directly under the footing, where loads are concentrated, is crucial to foundation performance. |
Footing Dimensions
So, how does soil bearing capacity relate to the size of footings? The footing
transmits the load into the soil. The lower the bearing capacity of the soil,
the wider the footing needs to be. If the soil is very strong, the footing
isn't even strictly necessary -- just the soil under the wall would be enough
to hold the building up.
Minimum Width of Concrete
or
|
||||||
|
Load-Bearing Value of Soil (psf)
|
||||||
|
1,500 |
2,000 |
2,500 |
3,000 |
3,500 |
4,000 |
|
| Conventional Wood Frame Construction | ||||||
| 1-story |
16
|
12
|
10
|
8
|
7
|
6
|
| 2-story |
19
|
15
|
12
|
10
|
8
|
7
|
| 3-story |
22
|
17
|
14
|
11
|
10
|
9
|
| 4-Inch Brick Veneer Over Wood Frame or 8-Inch Hollow Concrete Masonry |
||||||
| 1-story |
19
|
15
|
12
|
10
|
8
|
7
|
| 2-story |
25
|
19
|
15
|
13
|
11
|
10
|
| 3-story |
31
|
23
|
19
|
16
|
13
|
12
|
| 8-Inch Solid or Fully Grouted Masonry | ||||||
| 1-story |
22
|
17
|
13
|
11
|
10
|
9
|
| 2-story |
31
|
23
|
19
|
16
|
13
|
12
|
| 3-story |
40
|
30
|
24
|
20
|
17
|
15
|
| Source: Table 403.1; CABO One- and Two- Family Dwelling Code; 1995. | ||||||
You can look up the recommended footing size, based on the size and type of
house and the bearing capacity of the soil (see the table above). As you can
see, heavy houses on weak soil need footings 2 feet wide or more. But the
lightest buildings on the strongest soil require footings as narrow as 7 or 8
inches. Under an 8-inch-thick wall, that's the same as saying you have no
footing.
These numbers come from assumptions about the weights of building materials and the live and dead loads on roofs and floors. The allowable bearing capacity of the soil under the footing has to equal the load imposed by the structure. Reading down the table, you see that the code calls for a 12-inch-wide footing under a two-story wood-frame house in 2,500-psf-bearing soil. A 12-inch footing is 1 square foot of area per lineal foot, so the code is saying that the portion of a two-story wood house that bears on the outside walls weighs about 2,500 pounds -- maybe a little conservative, but reasonable. The same size footing is called for under a one-story house if it has brick veneer -- the brick is assumed to weigh as much as a whole second story.
If you had an engineer design the footing based on soil testing numbers and your prints, he'd add up the actual weights of the concrete, wood, and brick you'd be using in your building, factor in the required live loads, and come up with an estimate of the weight your actual house puts on the footing. It might be a little less or a little more than the code assumes. Then he would take the known bearing strength of the soil -- what a square foot of the soil can be trusted to support -- and design the footing so that the area under the footing multiplied by the bearing strength of the soil would equal or exceed the actual load.
In practice, you don't have to do this engineering on most houses. The amount you'd differ from a standard code-compliant footing isn't worth worrying about. Unless you have retaining walls or some other special situation, an engineer's fee probably isn't justified.
In any case, I wouldn't recommend that builders cut back on their standard footing size even if they know they're building on strong soil. Regardless of bearing requirements, masons and poured-wall contractors want footings for their block or their forms to sit on. But the lesson to take is that when soils are very strong, (4,000-psf capacity or better), the footings may not be strictly necessary from the standpoint of bearing. This means it is less important, for example, whether the wall is correctly placed in the center of the footing.
Fixes for Misplaced Footings
It's hard sometimes to position footings in the trench, so contractors often
see walls that are not in the center of the footing (Figure 3). The foundation
wall has to be located correctly to support the house, of course, so it has
been placed off-center on the footing.
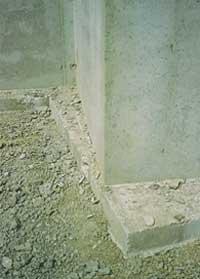 |
Figure 3. This incorrectly placed footing caused the foundation wall to be off-center. If the soil is very strong, this may not lead to problems. If the footing is on a weaker soil however, the author will recommend that it be fixed. |
In good bearing soil, I wouldn't get too concerned about this foundation for the loads involved in a simple wood frame house. The full width of the footing isn't needed to support the loads anyway; you could pour the wall right on the edge of the footing and still have enough support. However, if you start to go over the edge and have the wall sticking out past the footing on the side or on the end, then you're starting to apply a rotational force that the footing is not designed to handle. In that case, you should think about getting an engineer involved. (If your soils are relatively soft, the risk is even greater.)
As an engineer, I've been asked to recommend solutions in cases where the footing has been placed so that the wall, when cast, would actually extend beyond it. My suggestions are different in strong soils than in average or below-average soils (Figure 4). In soils with bearing capacity greater than about 4,000 psf, I suggest excavating next to the footing and under it, and placing compacted large gravel into the space. That should be adequate to support the wall. If there's a keyway in the wall, fill it in, and if there's steel projecting from the footing, cut it off. Drill holes and epoxy steel into the footing to tie the wall to the footing, and then form and cast the wall. In weaker soils, you have to augment the footing itself with steel and concrete. Excavate as before, but instead of using gravel, drill into the side of the footing and epoxy steel dowels into it, then place concrete to extend the footing out to the proper width.
 |
| Figure 4. In strong soils, a mistake in footing layout can be corrected by placing gravel to support the wall (top). In weaker soils, the author recommends casting an augmented footing alongside the existing footing (above), connected by dowels epoxied into the side of the existing footing. Be sure to fill any notches in the footing, and cut off any existing steel dowels that will miss the wall. |
In weaker soils, you have to augment the footing itself with steel and concrete.
Excavate as before, but instead of using gravel, drill into the side of the
footing and epoxy steel dowels into it, then place concrete to extend the footing
out to the proper width.
Spanning Over a Soft Spot
Some sites have occasional soft spots in otherwise good soil. You usually
discover such spots when you're driving stakes for the footing forms -- you hit
a stake and it just about disappears with one blow. Maybe there's a layer of
soft clay that rises from an old lake bottom at an angle and just intersects
your trench in one or two places. If a stake sinks in easily under hand
pressure, there's cause for concern (Figure 5).
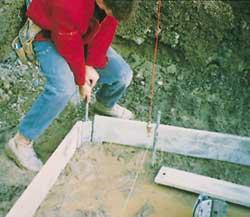 |
Figure 5. If a form stake sinks in too easily, the soil may be too soft. For localized soft spots, the author recommends widening the footing. In wet, mucky areas, he recommends compacting large cobbles into the mud to provide bearing. |
You may have to excavate down past the soft spot and place a deeper footing, then pour a taller wall. Or you may have to pier down through the soft material to get a bearing on good material. Another option is to excavate out the soft soil and replace it with compacted gravel or low-strength concrete, also called "lean fill" (see "A Quick Cure for Problem Soils," 1/00).
But in many cases, widening the footing is the simplest solution. If you've got a 16-inch footing, increasing that to 32 inches doubles your bearing area, making the footing suitable for soil with half the capacity.
If you increase the footing width, the code requires an increased thickness as well (Figure 6). That's because a footing that's too wide and not thick enough will experience a bending force that could crack the concrete. The projection of the footing on either side of the wall is supposed to be no greater than the depth of the footing.
 |
| Figure 6. When a footing must be widened to boost bearing ability, it should also be reinforced or deepened. An unreinforced footing that is too wide may crack close to the wall, overloading the soil beneath. Without reinforcement, codes say the thickness of the footing should be at least as great as the distance it projects next to the wall. As an alternative, the author recommends transverse (crosswise) #4 bar at 12 inches o.c. |
So, for example, a 32-inch-wide footing under an 8-inch wall would need to be at least 12 inches thick. Instead, however, you could reinforce the footing with transverse steel (running in the crosswise direction, not along the footing). In most residential situations, #4 rod at 12 inches o.c. will be plenty for 8-inch-thick footings up to 4 feet wide. The steel should be placed about 3 inches up from the bottom of the footing.
Even though a lot of contractors do it, one thing that will not help you span a soft spot in the soil is to add more steel along the long dimension of the footing. Throwing more longitudinal steel into a footing in this situation is just a waste of time and money. If you're going to add lengthwise steel, put it where it will do some good: in the wall, not the footing. Just as a 2x12 on edge is way stronger than a 2x4 on the flat, steel at the top and bottom of an 8-foot or 9-foot wall does much more work than steel placed into a skinny little footing (Figure 7). A wall with two #4 bars at the top and two at the bottom can span over a small soft area with no problem.
 |
| Figure 7. Steel in the wall has a greater effect than steel placed in the footing. In the wall, steel bars are almost 8 feet apart, while in a footing, the bars are only a few inches apart; the greater the spacing, the better the effect. |
Water in the Excavation
When you're working in an area with a perched water table during the wet season,
you sometimes find ground water moving into your trench. If the flow is slow
enough so you can pump the water out without it flowing right back in, then
that's the best solution. You can place concrete in up to 1 inch of water --
concrete is 2 1/2 times heavier than water, and it will displace the water.
You might want to thicken the footings in that case, because the bottom of
the concrete may absorb some water and be a little weaker than normal.
But if the soil is loose and porous, and water and soil keep coming back into the trench as you pump the water out, use large aggregate to build up the trench. For this, large stone or cobbles -- 2 1/2-inch- or 3-inch-diameter rock -- are best (Figure 8).
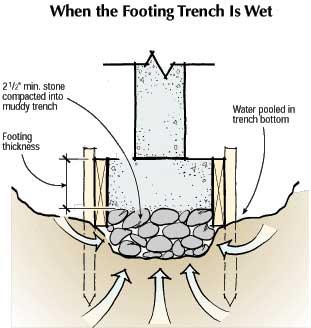 |
| Figure 8. When water is pooled in the trench, the author recommends placing large cobbles in the form bottom and compacting them down into the mud. Muck and water may fill the spaces between stones, but contact between the stones will provide bearing. Be sure to use a stiff concrete mix when you cast the footings. |
When you form the footings, place enough large stone into the wet, mucky zone to get up above the water table. Compact the stone down into the mud, then pour your footing. The large aggregate allows the muck to fill into the pore space, but as long as all the pieces of stone are in contact with each other, the stone can still transfer the load.
If the stone is piled so high in the forms that your footing becomes too thin (less than 4 inches thick), place transverse rebar to reinforce it, as shown in Figure 6 (be sure that the footings are thick enough to cover the steel by at least 3 inches).
Changes in Elevation
It's pretty common for a short wall to tie into a tall wall, especially in the
North, where most houses have full basements but garages just have short frost
walls. The code calls for continuous footings at all points (Figure 9). But
that part of the code dates from the days when foundations were made mostly
with concrete block, not poured concrete. Masonry foundation walls have no
real spanning capability, so they have to be stepped down when elevations change.
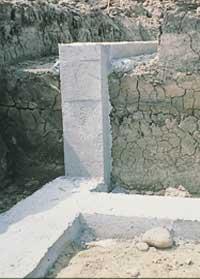 |
Figure 9. Stepped footings are used at changes in elevation in masonry foundations, but may not be necessary for poured concrete foundations. |
Concrete walls, on the other hand, can be reinforced with steel to span openings. That means the footings can be discontinuous, jumping from the 4-foot to the 8-foot or 9-foot elevation. The shorter wall can span the distance (Figure 10).
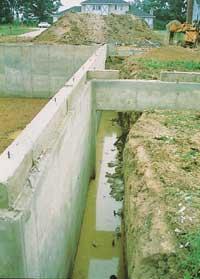 |
Figure 10. A short reinforced concrete wall has been formed and cast to span the distance from its footing to the adjoining wall (the trench will be backfilled as usual). |
The concrete has to be appropriately reinforced. A typical house situation, where a 4-foot garage frost wall has to span 4 feet or less and tie into the main foundation, calls for two #4 bars at the top of the wall and two #4 bars at the bottom. The steel has to extend 3 feet into the main wall and 3 feet into the shorter wall beyond the point where the footing starts (Figure 11).
 |
| Figure 11. Discontinuous footings work fine for concrete walls, which can be reinforced to take the loads. A typical situation where a garage stemwall abuts a main basement wall can be handled by reinforcing the short section of wall that spans the opening with two #4 bars at the top and bottom, extending 3 feet into each adjoining section of wall above the footing. This solution is limited to a 4-foot maximum span and a 5-foot maximum change in elevation. If the walls are at right angles, the rebar has to be bent accordingly. |
For this detail, the footings are formed and cast as usual. When you form the walls, the bottom of the forms must be capped with a piece of wood where the forms pass over empty space. In termite country, that wood must be stripped when the forms come off.
Brent Anderson is a consulting engineer and concrete contractor who serves on the American Concrete Institute Committee 332, Residential Concrete.
This article has been provided by www.jlconline.com. JLC-Online is produced by the editors and publishers of The Journal of Light Construction, a monthly magazine serving residential and light-commercial builders, remodelers, designers, and other trade professionals.
Join our Network
Connect with customers looking to do your most profitable projects in the areas you like to work.