Business Articles - On the Job
Articles & Tips
Floor-to-floor bracing is simple, fast, and permanent
By Dave Cunningham
I work in and around Kansas City, Mo., where the land is river bottom and the
soil is all clay -- one of our counties is even called Clay County. Most of
the houses built on this heavy, unstable soil are candidates for foundation
work -- drainage and waterproofing, foundation jacking, or wall repair.
Many of the homes in the postWorld War II developments have block basements,
often laid with no grout or rebar in the cores. I've rebuilt a lot of those
basements, but there's plenty of work ahead of me. Other homes have stone foundations,
which are also vulnerable to buckling inward from soil pressure. Even many of
the poured concrete walls have tipped inward. That's why I've been able to make
basement work a big part of my remodeling business.
Some walls (especially the stone and block ones) have to be torn out and rebuilt.
But if they haven't moved too far, it's often effective to reinforce them in
place, which is the subject of this article.
Buckled and tilted basements often get reinforced using helical anchors that
bolt through the basement wall (see Figure 1). The contractor drills a hole
in the wall and drives the anchor out into the yard at an angle, then installs
a steel plate with a bolt on the inside. But, in my experience, that doesn't
work around here. I often end up ripping those anchors out and starting over.
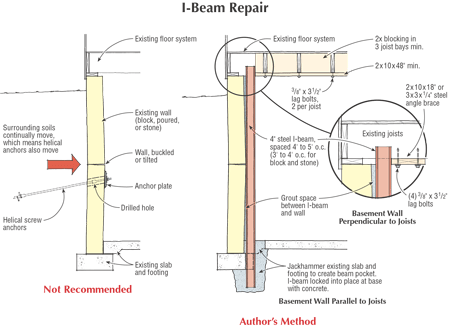
Figure 1. Helical screw
anchors (left) rely on surrounding soils to stabilize walls and may need routine
retightening. The author prefers an I-beam solution (right) commonly recommended
by engineers in his area. The base of each I-beam is braced by soil and the
basement slab, while the top is braced by a firm attachment to the first-floor
frame. The author has had good results with I-beams spaced 3 to 6 feet on-center.
That's because the soils in our area continually move, which means the anchors
move, too. So year after year you have to come in and torque down the nuts again
so the wall won't move. Homeowners typically need someone else to do that, so
you're taking on a lot of service calls. Also, it means that if you want to
finish off the basement, you have to leave access ports so you can get to the
nuts.
The method I use is the one usually recommended by engineers in my area. It
relies on the house structure for support. I stabilize basement walls with steel
I-beams, placed vertically against the wall and spaced anywhere from 3 to 6
feet apart. I break open the concrete floor and footing, dig down at least 12
to 16 inches, place the I-beam in on end, pour a concrete pier around it, and
then brace it off at the joists with 2x10s or 3x3 angle iron. Then I grout between
the beam and the wall using stiff concrete. I've done so many of these jobs
I can't count them all. Over the years, I've gone back and checked a lot of
them, and not one has moved a bit.
Sizing Up the Job
The first thing I do when I'm checking out a basement wall is to put my ear
against it and sight down the wall to see what we're up against. Then I put
my 6-foot level against the major bulges to see just how far out of plumb it
is.
If the wall's less than 3 or 4 inches out of plumb, we can safely "I-beam" it
as is (Figure 2). If a poured concrete wall is 3 or more inches out of whack,
I'll typically excavate the outside and push the wall back into plumb before
I stabilize it. A block or stone wall that has bulged more than 3 inches should
be replaced: The mortar joints are probably shot, and you can't expect to push
that back out and have anything solid left. I tear those walls apart and rebuild
with new block.
I-Beam Placement Stabilizing Basement Walls with Steel I-Beams, continued The top brace connection varies depending on whether the joists run perpendicular
to the wall or parallel. Perpendicular joists supply strong bracing -- a single
2x10 or piece of angle iron spanning one joist bay is plenty. But a joist parallel
to the wall is oriented sideways to the force of the wall pressure and can't
handle the load by itself. In that case, I place solid blocking into the joist
bays for three or four joists back from the wall, then lag a 2x10 into the joists
under the blocking (Figure 5). This transfers the load of the I-beam into the
whole floor system instead of dumping it all onto the side of one joist.
Connect with customers looking to do your most profitable projects in the areas you like to work.
Figure 2. Block basement
walls (top) tend to bulge in the center. Poured walls (bottom) are more likely
to lean inward at the top due to failure of the sill connection. I-beams can
stabilize both types of wall in place as long as the deflection is no greater
than 3 inches. Block walls that are more than 3 inches out should probably be
rebuilt. Poured walls that are more than 3 inches out can be pushed back to
plumb and then stiffened with I-beams. For jobs requiring rebuilding or pushing
back walls, exterior soils must be excavated, but for simple stabilization jobs,
regrading may be sufficient.
That 3-inch rule of thumb is consistent with engineering reports I've seen over
the years, and it has always worked for me. In fact, generally I will not warrant
an I-beam job on a wall that is more than 3 inches out of plumb, unless I've
pushed the wall back where it belongs.
The choice is really up to the homeowner, though. Some homeowners will insist
that I push back a wall that's only an inch or two out of plumb, even after
I assure them that stabilizing it in place is sufficient. Other homeowners may
just want to stabilize a wall in place even if it's 5 inches in -- which I don't
mind doing as long as they understand that it's not guaranteed.
Dealing with drainage. After I assess the basement, I go outside
to find out what's causing the problem. Reducing the pressures on the wall so
the problem won't get worse later helps the I-beam repair.
As I mentioned, practically every house I see is sited in clay soil. But drainage
and runoff are usually factors, too, when there's a problem wall. Houses with
leaning basement walls are often just in a bad spot -- at the bottom of a hill
or the end of a cul-de-sac -- or their yard and driveway slope toward the house.
Even on flat sites, many of the problem homes have a negative grade funneling
water toward the foundation, and a surprising percentage have no roof gutters.
Bringing in dirt to create a positive grade and installing gutters with extended
downspouts to carry water 4 or 6 feet away from the house make a world of difference.
Another common source of problems is a heavy concrete stoop in front of the
house that is settling down and pushing the soft clay backfill against the basement.
I often recommend replacing that concrete mass with a wood deck or porch.
Steel yards carry beams in standard dimensions and weights. I use 4-inch-deep
I-beams that weigh 9.5 pounds per foot. You can cut the steel on site with a
cutting torch if need be, but generally I measure first to find out what length
I need, then have the pieces cut for me at the steel yard.
For a concrete wall, I set the I-beams 4 to 5 feet apart. If the wall is block
or stone, 3 to 4 feet apart is a safer bet. In any case, I position the beams
so that they can extend up into a joist bay -- steel or wood blocks spanning
the joists will hold the I-beams tight to the wall. After laying out the I-beam
locations, I break out a 1-foot-diameter hole for each I-beam using a jackhammer
(Figure 3).
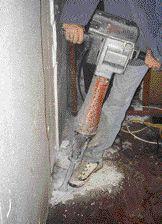
Figure 3. After cutting
back the insulating foam, a worker jackhammers through the floor slab and footing
edge. A steel I-beam will be placed in each hole and set in concrete. The author
prefers jackhammering to concrete sawing, because it creates less dust and provides
a rough edge for good bonding between the existing concrete and the freshly
placed pier footing.
I prefer jackhammering to sawing concrete for a couple of reasons. A concrete
saw throws off a lot of fine dust, which is unsafe and makes a mess throughout
the house. Besides that, sawing concrete leaves a smooth, shiny surface on the
face you cut, and when you pour the patch, the new concrete doesn't bond to
the old concrete -- there will be a crack when the new concrete cures. Jackhammering,
by contrast, leaves a rough cut edge that gives the new and old concrete surfaces
a better chance of bonding.
When my holes are ready, I set an I-beam in each. I place each I-beam tight
against the wall, hold it plumb, and brace it in place with a 2x10 block or
a piece of 3x3 1/4-inch angle iron, lag bolted into the joists above (Figure
4). The I-beam contacts the wall wherever the wall is farthest out (usually
in the middle for block walls and at the top for poured walls).
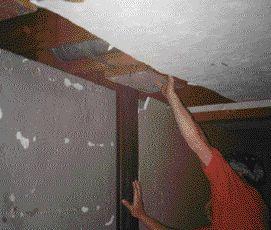
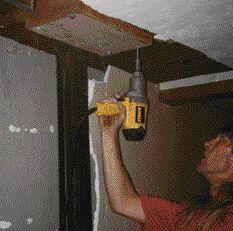
Figure 4. A worker braces
the top of an I-beam tight against the top of the leaning wall (top). The 2x10
brace is fastened to the existing floor joists using 3/8-inch lag bolts sunk
into predrilled holes (bottom). Three-inch by three-inch angle iron can be used
instead of the 2x10 block. This step is easier with two people -- one to hold
the I-beam and block in place, and one to set the lag bolts.
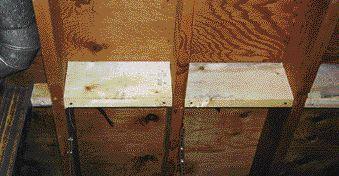
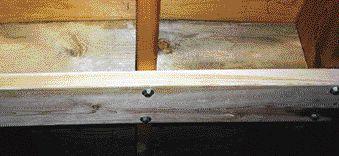
Figure 5. For bracing
perpendicular to the floor joists, the author places solid blocking into at
least three joist bays and lag bolts the brace to each of the joists directly
under the blocking. The joist nearest the beam could not do the job on its own
without this arrangement.
When my beams are pinned at the top, I plumb them up and brace them into the
holes at the bottom. It's tricky to hold them still while you grout the bottom
and the space between the I-beam and the wall. After years of struggling with
that, I started bracing the foot of each beam into the hole with scraps of wood
(Figure 6). It's quick and easy, and the wood gets buried in the concrete base
of the pier.
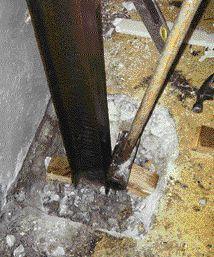
Figure 6. The author
braces the base of each I-beam in place with small blocks of wood. The wood
blocks will be encased in the concrete pier base when the hole is grouted.
Next I grout the space between the I-beam and the wall with stiff concrete (Figure
7). I mix a batch of sack concrete in a wheelbarrow (dry enough to make a firm
ball in my hands), put on some rubber gloves, and just pack it into the gap
and whittle it smooth. That provides solid support for the wall from floor to
sill.
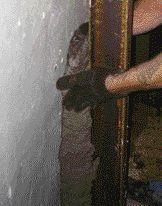
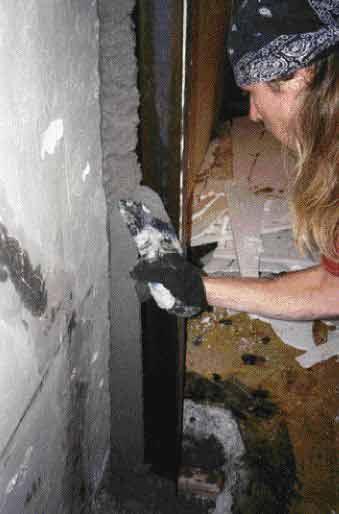
Figure 7. A worker grouts
the entire space between the I-beam and the wall with stiff concrete to provide
full support for the wall. Excess grout is smoothed away for a clean finish
(see photo at beginning of article).
Finally, I fill in the hole at the base of the I-beam, locking it into the earth
and the existing slab (Figure 8). That makes the whole assembly one continuous,
solid structure. In the six years I've been doing it, I've never seen one of
these I-beams budge a millimeter.
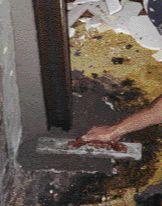
Figure 8. The hole is
filled with stiff concrete to embed the I-beam firmly into the slab and subbase.
The surface is troweled level with the existing slab.
All I've described here is the wall stabilization. Many of these basements also
need exterior waterproofing or an interior drain and sump system. As long as
the water problems have been dealt with, the basement space can be finished
any way the homeowner wants to once the I-beams are set (Figure 9). There's
no need to leave access to the I-beams -- they can be simply painted, or boxed
in and buried.
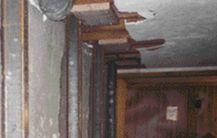
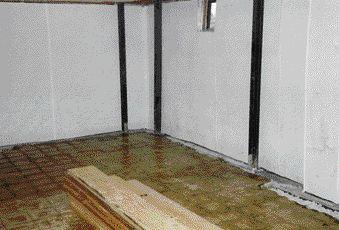
Figure 9. The completed
I-beam installation (top) supplies reinforcing for the wall from footing to
sill at 3 to 6 feet on-center. In the example below, the author then applied
fiber-reinforced plastic panels to the basement walls. The basement is now ready
for further finishing.
Costs and Scheduling
Jobs that require excavating call for careful estimating. There are dozens of
factors to keep in mind -- access, proximity to neighboring homes, attached
steps or other structures, landscaping, and possible low overhangs that can
impede the excavator, to name a few.
But estimating a basic wall stabilization job is simple. Given a typical 30-foot
wall to brace, I know I can break out the floor, dig the holes, and place the
seven or eight beams that are needed in one day. I know it will take half of
a second day to do all the grouting and clean up.
The only materials costs are for the beams, grout, lag bolts, and wood or angle
iron for top bracing -- which comes to about $50 total in materials for each
8-foot I-beam I install. I price jobs to the homeowner for about $200 to $250
per beam, which covers labor, overhead, and profit.
For small jobs, I don't take a deposit. I just put the house on my schedule
and call the owners a day or two before I start. Once I do start, I stay on
the job until it's done; when I finish, they can pay me with a check or credit
card. With this arrangement, I don't feel under pressure if I'm a day or two
late getting started.
These small jobs often lead to larger jobs. Many of the people whose basements
I've fixed will call me back later to finish out the space, or to do some kind
of exterior grading or concrete work. And they often refer me to their friends
as well -- I get most of these jobs through word of mouth.
That's especially true of the homeowners who like to watch. Some homeowners
don't want to know what we're doing, as long as we get it done. Others will
pull out lawn chairs, pack a lunch, and sit and watch us for the whole time.
Every few minutes, I find myself stopping to explain what we're doing and why.
But that doesn't bother me a bit -- the way I figure it, that makes them a little
more educated. And it also means that when I'm done, they're that much more
likely to refer me to someone else who needs my help.
Dave Cunningham is a remodeling contractor based in Independence,
Mo.
This article has been provided by www.jlconline.com. JLC-Online is produced by the editors and publishers of The Journal of Light Construction, a monthly magazine serving residential and light-commercial builders, remodelers, designers, and other trade professionals.Join our Network